Nothing beats the sweet, salty crunch of a homemade peanut clusters recipe. Whether you’re craving a quick treat or making holiday gifts, these bite-sized delights are the perfect indulgence. In this guide, we’ll walk you through everything—from simple ingredient choices to pro-level tips. By the end, you’ll be a peanut cluster expert!
Part 1: Introduction to Peanut Clusters
What Are Peanut Clusters?
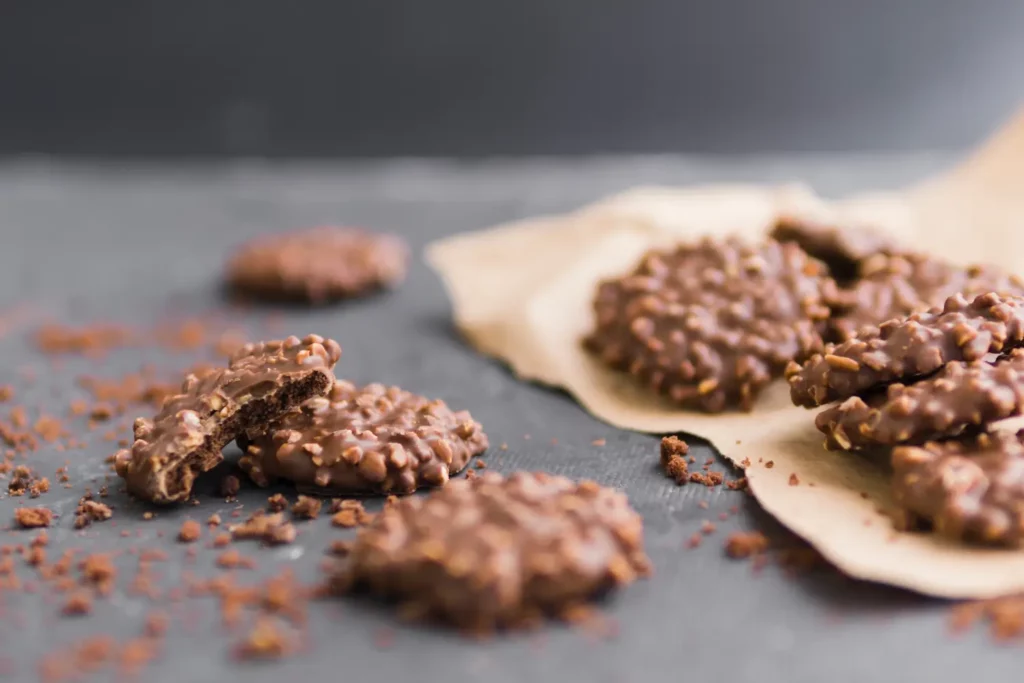
Peanut clusters are deliciously simple confections made from melted chocolate and roasted peanuts, shaped into bite-sized pieces. They’re one of those timeless desserts that marry the rich, velvety texture of chocolate with the nutty, salty crunch of peanuts. The result? A heavenly contrast of flavors and textures that’s as addictive as it sounds!
These little treats have been a holiday staple for generations, especially since they’re easy to whip up and perfect for gifting. But peanut clusters aren’t just for the holidays—they’re an all-year-round comfort snack!
Why Are Peanut Clusters Popular?
The appeal of peanut clusters lies in their versatility. They’re no-bake, require minimal ingredients, and are customizable to suit any palate. Whether you love dark chocolate, white chocolate, or a mix of both, there’s a version for you.
Another reason for their popularity is their longevity. When stored correctly, they stay fresh for weeks, making them perfect for make-ahead snacking. Plus, they’re a hit at holiday cookie exchanges, potlucks, or casual movie nights.
Additionally, peanut clusters are an excellent introduction to candy-making for beginners. There’s no need to temper chocolate like a chocolatier—just melt, mix, and scoop! And thanks to their simple ingredient list, you won’t need fancy equipment, just a few pantry staples.
In the next part, we’ll dive into the essential ingredients that make this recipe shine and how to choose the best ones for optimal flavor.
Part 2: Ingredients for the Best Peanut Clusters
Essential Ingredients Breakdown
When it comes to the perfect peanut clusters recipe, simplicity is key, but quality makes all the difference. Here’s a breakdown of the must-have ingredients:
- Chocolate: The star ingredient—use chocolate chips, bars, or melts. Dark, milk, or white chocolate all work, but ensure it’s of high quality. Chocolate with a cocoa content of at least 60% gives a rich depth, while milk chocolate adds sweetness.
- Peanuts: Roasted, unsalted peanuts provide the perfect crunch and balance to the sweetness. You can also experiment with salted peanuts for that sweet and salty contrast.
- Optional Add-ins: Want to jazz things up? Add shredded coconut, crushed pretzels, or butterscotch chips. You can also try almond or cashew substitutions.
For ideas on creative desserts, you can explore unique cookie recipes that might inspire other toppings for your clusters!
Choosing the Right Type of Chocolate
Here’s where personal preference plays a big role:
- Dark Chocolate: Ideal for those who prefer a bittersweet bite.
- Milk Chocolate: Creamy and sweet, it’s a kid-friendly favorite.
- White Chocolate: Technically not chocolate but adds a velvety, buttery flavor that complements peanuts well.
If you’re unsure, a mix of dark and milk chocolate creates a balanced flavor. Additionally, tempering isn’t necessary, but using a slow-melting process in a double boiler helps prevent clumping.
In the next section, we’ll walk through the foolproof steps for making these clusters!
Part 3: Peanut Clusters Recipe (Step-by-Step Instructions)
Preparation Process
Before you start, line a baking sheet with parchment paper or a silicone mat—this will keep your clusters from sticking. Measure out your ingredients so everything is ready to go.
Melting the Chocolate Perfectly
- Double Boiler Method: Fill a pot with a few inches of water and place a heat-safe bowl on top. The bowl shouldn’t touch the water. Add your chocolate and stir frequently as it melts.
- Microwave Method: Add chocolate to a microwave-safe bowl and heat in 30-second intervals, stirring in between to prevent burning.
Pro Tip: Adding a teaspoon of coconut oil or butter can make the chocolate smoother.
Mixing and Forming the Clusters
- Mixing: Once the chocolate is fully melted, stir in your peanuts until they’re well-coated.
- Forming: Use a spoon to drop clusters onto the lined baking sheet. Aim for bite-sized portions.
- Cooling: Let the clusters set at room temperature for 1–2 hours or speed things up by placing the tray in the fridge for 30 minutes.
Once hardened, your homemade peanut clusters are ready to enjoy! They make an amazing homemade treat for any gathering or snack time.
For a twist on homemade sweets, you can check out their brookie recipe for more inspiration.
Part 4: Variations of Peanut Clusters
Milk vs. Dark Chocolate Peanut Clusters
One of the simplest ways to customize your peanut clusters recipe is by switching up the type of chocolate. Milk chocolate clusters are creamy and sweet, making them perfect for those with a sweet tooth. Dark chocolate clusters, on the other hand, bring a rich, intense flavor that pairs beautifully with the roasted peanuts.
If you’re torn between the two, why not mix them? A blend of milk and dark chocolate creates a balanced sweetness with just the right amount of bitterness.
White Chocolate and Peanut Butter Clusters
For a unique twist, try making clusters with white chocolate or even a white chocolate and peanut butter combo. White chocolate adds a creamy, buttery richness, while peanut butter boosts the nutty flavors for an extra indulgent treat. Here’s how to adjust:
- Melt the white chocolate first and stir in a spoonful of peanut butter.
- Add the peanuts and form clusters as usual.
This version tastes like a bite of peanut butter bliss! For more ideas on creamy treats, you might enjoy their guide on cottage cheese desserts.
Adding Toppings and Mix-ins
Want to get even more creative? Toss in extra toppings like:
- Crushed pretzels for a salty crunch.
- Dried cranberries or raisins for a chewy, sweet contrast.
- Shredded coconut for a tropical twist.
You can also sprinkle the clusters with sea salt flakes or drizzle them with melted caramel for an added gourmet touch. These little additions make each batch customizable and fun for special occasions.
Part 5: Storage and Shelf Life of Peanut Clusters
How to Store Peanut Clusters
Proper storage ensures your peanut clusters stay fresh and delicious. Once the clusters have hardened, place them in an airtight container. If stacking the clusters, place a sheet of wax paper between layers to prevent sticking.
- Room Temperature: Store at room temperature in a cool, dry place for up to two weeks.
- Refrigeration: If you live in a warmer climate, refrigerating the clusters will prevent melting. They’ll last up to three weeks in the fridge.
- Freezing: For longer storage, freeze them! Place clusters in a freezer-safe bag and freeze for up to three months.
Ideal Shelf Life and Preservation Tips
Avoid exposing the clusters to heat or humidity, as this can cause the chocolate to develop a white “bloom”—a harmless but unappetizing discoloration. To bring frozen clusters back to room temperature, transfer them to the counter for 30 minutes before serving.
Part 6: Serving and Pairing Ideas
Festive Presentation for Holidays
When serving your peanut clusters recipe, presentation can take these simple treats to the next level. For holiday gatherings, place the clusters in decorative cupcake liners or arrange them on a festive tray with sprigs of pine or cinnamon sticks. You can also package them in clear treat bags tied with ribbons for a thoughtful homemade gift.
If you’re hosting, consider setting up a “sweet and salty” dessert station. Arrange your peanut clusters alongside pretzels, caramel popcorn, and chocolate bark for a visually appealing spread.
For more presentation inspiration, check out themed dessert guides that suggest fun plating ideas!
Pairing Peanut Clusters with Beverages
The rich flavors of chocolate and peanuts pair beautifully with a range of drinks:
- Coffee: A cup of strong black coffee balances the sweetness perfectly.
- Hot Chocolate: Double up on chocolatey goodness for a cozy treat.
- Milk: Classic and timeless, especially for kids.
You can also add the clusters as a topping for ice cream or yogurt. Whether it’s a quiet evening snack or a party favorite, the right pairing elevates every bite!
Part 7: Common Mistakes and How to Avoid Them
Overheating Chocolate
One of the most common pitfalls when making a peanut clusters recipe is overheating the chocolate. When chocolate overheats, it becomes lumpy, grainy, or even scorches. To prevent this, always melt chocolate over low heat and stir frequently. If using the microwave, heat in short intervals, stirring in between.
If your chocolate seizes (becomes thick and clumpy), don’t panic! Stir in a teaspoon of vegetable oil or melted butter to help smooth it out again.
Avoiding Clumping of Peanuts
Another common issue is uneven distribution of peanuts in the chocolate. To avoid this:
- Use a spatula to mix the peanuts thoroughly, making sure every piece is evenly coated.
- Work in small batches if you’re making a large quantity, so the chocolate doesn’t cool too quickly.
It’s also a good idea to ensure your peanuts are at room temperature before mixing. Cold peanuts can cause the chocolate to harden too fast, making it harder to form clusters.
Following these simple tips keeps your peanut clusters looking uniform and tasting amazing. For more sweet treats and techniques, explore fun ideas like chocolate-dipped recipes for added variety in your dessert lineup!
Part 8: FAQs Section
Can I Make Peanut Clusters Ahead of Time?
Absolutely! One of the best things about this peanut clusters recipe is that it’s ideal for prepping ahead. You can make them a few days—or even weeks—in advance. If you’re planning for a party or holiday, simply store the clusters in an airtight container at room temperature or refrigerate them if you live in a warm climate.
When gifting, you can prepare large batches and store them until needed. Just be sure to layer parchment paper between each cluster to prevent sticking.
What Types of Nuts Can Be Substituted?
Peanuts are the star of this recipe, but if you’re feeling adventurous, you can swap them out for other nuts. Almonds, cashews, and pecans work wonderfully and provide unique textures and flavors. For a more gourmet twist, you can even mix a blend of nuts. Just keep in mind that some nuts, like hazelnuts, may have a stronger flavor that could overpower the chocolate.
How Do I Prevent Chocolate from Hardening Too Quickly?
If your chocolate mixture hardens before you can form the clusters, it may be cooling too fast. This is common in colder kitchens. To avoid this, keep the melted chocolate warm by placing it over a hot water bath or reheating briefly.
Are Peanut Clusters Gluten-Free?
Yes, most peanut clusters recipes are naturally gluten-free, as they typically contain only chocolate and peanuts. However, always check the labels on your chocolate, as some brands may have traces of gluten due to cross-contamination during processing.
Part 9: Health Considerations and Alternatives
Low-Sugar or Keto Peanut Clusters
If you’re looking to make a healthier version of the classic peanut clusters recipe, you can easily adapt it. Swap out regular chocolate for sugar-free or dark chocolate sweetened with stevia or monk fruit. These options cut down on sugar without sacrificing flavor. You can also reduce the overall sweetness by adding a small amount of unsweetened cocoa powder to balance the taste.
For a keto-friendly version, use unsalted roasted peanuts and sugar-free chocolate chips. The natural fat content in both ingredients makes this snack keto-approved and satisfying.
Allergy-Friendly Alternatives
For those with peanut allergies, this recipe can be adapted by swapping peanuts for allergy-friendly options like sunflower seeds, pumpkin seeds, or chopped roasted chickpeas. Another fun alternative is using toasted coconut flakes for a nut-free yet crunchy option.
Additionally, using dairy-free chocolate can make your clusters vegan-friendly. Just ensure that the chocolate you choose doesn’t contain milk solids. For more dessert alternatives that cater to dietary needs, you can experiment with recipes that incorporate natural sweeteners and plant-based ingredients.
With these adjustments, you can enjoy a delicious homemade treat that aligns with your health goals while still keeping the indulgent, chocolatey goodness!